Ideas for a melody-chord fingering chart

So many banjo books start with the idea that you have to spend a lot of time learning single-note melodies before you start playing chords and — heaven forbid! — chord melody. As a former trumpet player — and thus by nature a melodic rather than chordal thinker — I am comfortable with this. But maybe it would be better to start beginners RIGHT OFF with CHORD MELODY, from their first note, as if it were the ONLY WAY to play the banjo.

In other words, it might be nice if the beginning tenor-banjo player would simply learn that the note+chord combination

F note with F major chord

is played on frets 023X (the teacher or the method book could suggest fingerings). At this point there would be no need to learn any theory. For the student, it is just a melody note with a chord symbol on top of it, which equals a specific fingering.

Then, as if it were simply another note, he/she would learn that

F note with G7 chord

is played 243X. Again, no chord theory — that could come later. In other words, at the beginning, you just learn that

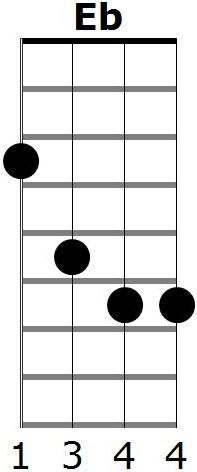
low F note + F chord = 023X

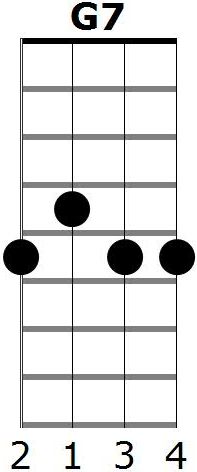
low F note + G7 chord = 243X

(etc.)

Within a few weeks, of course, the player will learn the “real” explanation of just what chord melody is and how it works. But it seems to me that a beginning student’s lack of theoretical knowledge is no reason for him/her not to start right in on chord melody.

So (I was thinking) … what if somebody did write a banjo method for absolute beginners based ENTIRELY on CHORD MELODY? How would they organize it? I am familiar with a lot of beginning trumpet method books, and you could do worse than to imitate them.

One thing which beginning trumpet methods always have is a COMPLETE LIST, on the first or last page, of ALL the fingerings used in the book. It is presented in reference order (usually chromatic), not learning order (which is the job of the lessons in the body of the book). The student can refer to this list any time he/she has a doubt about fingering. (The most proactive students will probably be fascinated by the list and try out all the chords on their own, which will presumably do them no harm.)

This list has to be simple and easy to understand. Beginning trumpet fingering charts generally have a very simple and elegant presentation:

Beginner's trumpet fingering chart

Although the above chart is for beginners — a more advanced one would include alternative fingerings and higher notes — even an advanced chart is very simple and almost impossible to misunderstand.

I started wondering whether I could make a trumpet-style fingering chart for this (theoretical) beginning banjo method. Chord diagrams are all very well and good, but there must be an alternative which is more space-efficient but still very easy to understand. Of course, since each melody note on the banjo has several possible versions, depending on which chord is to be played with it (not to mention the many alternative chords), a “simple” banjo fingering chart will necessarily have more entries — and more fingering numbers — than a trumpet chart. But it could still be SIMPLE.

My first idea was to have my chart look something like this, very similar to the trumpet chart shown above:


I like it a lot — it is easy to understand and occupies very little space. The very definition of elegant and simple. (Note: I have chosen to use actual pitch for the notes, as is common in chord-melody methods.)

However, there is an equally elegant, though less space-efficient, way to present the same information. And it has the advantage of centuries of tradition, so it will be instantly understandable to any banjoist. It is, of course, tablature:

F note with F major chord and tablature            F note with G7 chord and tablature

(Another advantage of tablature is that is easy to create in my music-editing program, Finale.)

A practical application: I am presently learning “Oh, Susanna” in C major, from Tim Allan’s Notebook, pp. 22-23. It is a simple chord-melody version of the tune in two octaves, and Tim very sensibly starts out with a list of all the versions of the four chords used (C, F, G7 and Am), including some short “etudes” to practice the chord inversions. All the C chords come together, then an etude, then F and an etude, and so on.

I wouldn’t change a thing about Tim’s presentation, which is perfect for what he is teaching. But if I were going to write the absolute beginner’s banjo method described above, perhaps I would print something like the following at the beginning of the book:

Fingering chart for Tim Allan's

(You can click on the above image to get a nicer PDF version.) By the way, I added a few chords that were not in Tim’s listing.

Of course the above chart is just for one piece, “Oh, Susanna”. A complete chart for an entire book would include more chords. Over the next few weeks I will experiment with this format to see if it is at all useful, adding new (basic) melody chords as I come across them.

Okay, you ask, so what’s the innovation? Well, in fact, I would not be surprised to find out that someone else has already done exactly the same thing as I have described here. But if they haven’t, I guess my new twist is the idea of making a reference list of melody chords in chromatic order, with no attempt at including anything other than fingering. I know this is an anti-intellectual approach, but, remember, it is only for beginners.

My lesson with Tim Allan

This past Wednesday I had an on-line lesson with Tim Allan, a fantastic player who has been around for a long time — he was inducted into the National Four-String Banjo Hall of Fame back in 2002. I knew of him through some of his books and recordings (I have his 40 Easy Reading Song Arrangements and Tim Allan’s Notes) and later via his YouTube videos.

He is a really nice guy, and the lesson was quite relaxed, but nonetheless he got a lot of information across. Over the years I’ve taken and given literally thousands of music lessons, and I consider myself something of an expert. One thing I liked about Tim was that he was quite sensitive to what I personally needed. (Not that it was particularly difficult for him — I came prepared with a long list of questions.) This is typical of good teachers — they observe their students and tailor the lesson to the student, instead of delivering a canned sermon….

I won’t go into everything he told me — that would be telling — but after the class I wrote up my notes about what I’d heard, and they took up two pages in rather small type! Since this was my first banjo lesson with anyone, a lot of my questions were to see if the things I was already doing were correct. Among other things, my questions were about:

  • left hand position
  • pick holding
  • position of other right-hand fingers
  • where the banjo should rest when playing seated
  • Dixieland chordal accompaniment style
  • fingering — guitar-style or mandolin-style?
  • how to connect chords
  • how to speed up my chord changes
  • whether I should use a strap

In general, I was not surprised by his answers — after all, I have spent years gathering data from method books, the Internet, videos, etc., so I was hardly unprepared. But it was good to get confirmation of some the things I wasn’t entirely sure about.

One thing I have learned over the years (on the trumpet) is that, when you have a lesson or master class with a top player, it is often best just to relax and observe him/her, rather than focusing solely on getting specific information. Subleties about posture, timing, use of tension, musical interpretation, etc. are best communicated on an almost wordless level. In fact, the observant student can sometimes learn things the the teacher doesn’t even realize he/she is teaching.

A lot of this stuff can be observed in concerts, which are, after all, public displays of what the player can do, but the communication in a private lesson is more two-way and much more relaxed. And you get the chance to ask your teacher to repeat things you didn’t catch the first time!

Although my present ambition is mainly to become an acceptable jazz-band rhythm player, what the tenor banjo is really all about is chord melody. That is, instead of just strumming accompaniment chords while someone else plays or sings the melody, the banjoist chooses the chords so that the most prominent notes (usually the highest ones) ARE the melody. This considerably increases the difficulty of playing, but it is something that I want to learn.

One of the things Tim said was that, where possible, the banjoist should choose chord fingerings which leave the left pinkie finger free to play melody tones. This means changing some of the standard fingerings found in method books. For example,

Eb (1 - traditional)   becomes   Eb (2 - pinkie free)                    and                    G7 (1 - traditional)   becomes   G7 (2 - pinkie free).

This allows the pinkie to play some extra non-chordal melody notes (the red dots). I understood this in principle, having read about it in one of Tim’s books, but I confess I was a little afraid to bend the first joint of the finger backwards, as these fingerings require. I guess I felt it would break or something. After seeing it demonstrated and subsequently trying it out for myself, I am convinced.

To cut a long story short: the lesson was a good experience, and I hope to repeat it sometime soon. Tim will be doing a European tour next month, but unfortunately he will not be anywhere near Seville. I’d love to see him live!

Hey, I’m still playing!

Hi everybody. Although I’ve been absent from this blog for approximately a zillion weeks, I have not been inactive on the banjo. At least not CONTINUALLY inactive. I find myself practicing and investigating and being fascinated … and then the problems of normal adult life intrude and I have to lay the banjo aside for a few weeks. I’ve had family members get sick. I’ve gotten sick myself. I’ve injured my fingers. I’ve gotten my work hours extended to take away my afternoon practice time. I’ve had to travel. And so on.

Nonetheless, the banjo is still a part of my life. On my practice spreadsheet — did I mention that I track my practice in a spreadsheet? — I have columns for the various things I am working on:

DATE Technique Method books Combo tunes Solo tunes My blog Misc. Mandolin

This makes it easy to see what I’ve been doing over time. And looking back, I can see that since my last blog posting things have gone like this:

  • JULY 2014 — I made a “Chord Diagrams” sheet for my own personal use, using a great chord-diagramming program called Neck Diagrams. Here’s a link to my beautiful chord-diagram sheet (in its last-ever version).
  • AUGUST 2014 — Realized that, however beautiful my chord diagrams were, my chord sheet was getting too hard to update. Switched to a text-only format (just the fret numbers), which worked well. I’ve kept updating it as I discover new chords. Click to see the latest version of my text-only chord sheet. Then went to the U.S. to visit my family and didn’t take my banjo with me.
  • SEPTEMBER 2014 — Had a stupid accident pulling up my socks (seriously!) and bent my left middle finger REALLY badly. I even ended up going the emergency room. Couldn’t play for over a month (and, in fact, the finger is still somewhat swollen now, six months after I hurt it).
  • OCTOBER 2014 — Started to play again, cautiously. Made a really good practice sheet for major scales, using Neck Diagrams. It’s different from the scale sheet I posted back in July, which was in standard staff notation. This one is simply a bunch of neck diagrams.
  • NOVEMBER 2014 — Decided on a list of seven Dixieland combo tunes to prepare (St. Louis Blues, St. James Infirmary, Tiger Rag, Just a Closer Walk, Swing Low Sweet Chariot, Tenderly, When the Saints). Was hoping to start my little Dixieland band soon. Practiced about half the days of this month. Decided I wanted a mandolin (when I saw how cheap they could be), the idea being I could take it with me in my suitcase whenever I travel and thus have something to practice.
  • DECEMBER 2014 — Work intruded a lot, and also Christmas (which lasts a long time in Spain, all the way through Epiphany on January 6th). Asked my family for a mandolin for Christmas.
  • JANUARY 2015 — Received my mandolin on Epiphany (which is when most Spaniards give and get their Christmas presents) and started practicing it a little. Cut my left middle finger chopping up vegetables or something and couldn’t practice for a week. Went to my Dad’s funeral at the end of the month. (He had died back in June, but he was to be buried in Arlington National Cemetery, for which there is a long waiting list.) Also visited my mother in Richmond, Virginia. Brought my mandolin along but didn’t practice it a single time.
  • FEBRUARY 2015 — Returned to Spain to a big backlog of classes (I teach music and English) and had no time to practice until the last week of the month.
  • MARCH 2015 — Was given a very time-consuming instensive English exam-prep class to teach in the afternoons (which I would prefer to dedicate to the banjo) and could scarcely practice at all. Decided to start another blog, Back 2 Seventeen, in which I decide to live my life as if I were 17 years old again. (I am really 58.) Finished the intensive class right at the end of the month.
  • APRIL 2015 — Started playing again on April 11th. Decided to ask Tim Allan, one of my favorite banjoists, for a lesson. If you don’t know about Tim, look at his YouTube channel. He is fabulous.

And today, I had that lesson! It’s getting kind of late, so I’ll describe it in a later post, maybe tomorrow or the day after. For now I’ll just mention that Tim is a really nice guy and a really fine teacher. I wrote up my notes after the 90-minute lesson; they covered two full pages in 11-point Calibri type….

I’ll stop for now, but rest assured that I am still at it, and still trying to apply what I know about the trumpet to what I am learning on the banjo….