FFcP system

Hi all. I have been practicing a lot. Got lots of new stuff to tell, and Lord only knows when I’ll have time to blog it. Here’s today’s thing: Ted Eschliman’s FFcP (Four-Finger Closed Position) fingering system. I learned about it at jazzmando.com/ffcp_studies.shtml

(The FFcP system described on that page is intended for the mandolin, but it works well on the banjo too.)

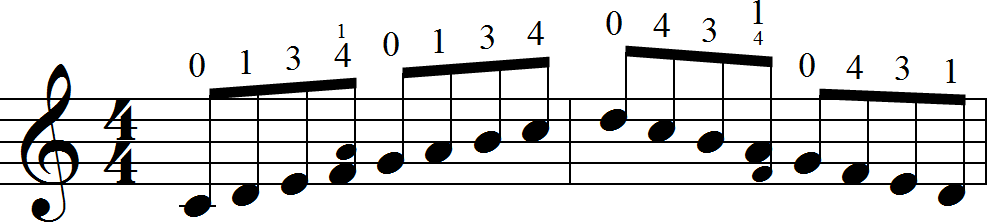
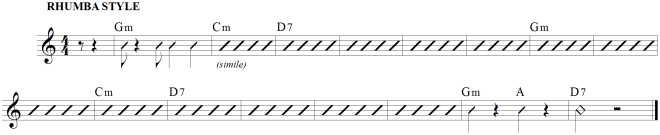
Let’s look at a major scale:

ffcp-figure-1-major-scale

It has eight notes. Since we have four fingers to use on the fingerboard, it makes sense to divide the scale into two halves:

ffcp-figure-2-major-tetrachords

These four-note successions are called “tetrachords”. Tetrachords are the basis of the FFcP system. Check out the whole-steps and half-steps. They are the same for both tetrachords!

F to G: a WHOLE step
G to A: a WHOLE step
A to B♭: a HALF step

C to D: a WHOLE step
D to E: a WHOLE step
E to F: a HALF step

This WHOLE-WHOLE-HALF pattern is always the same for major-scale tetrachords.

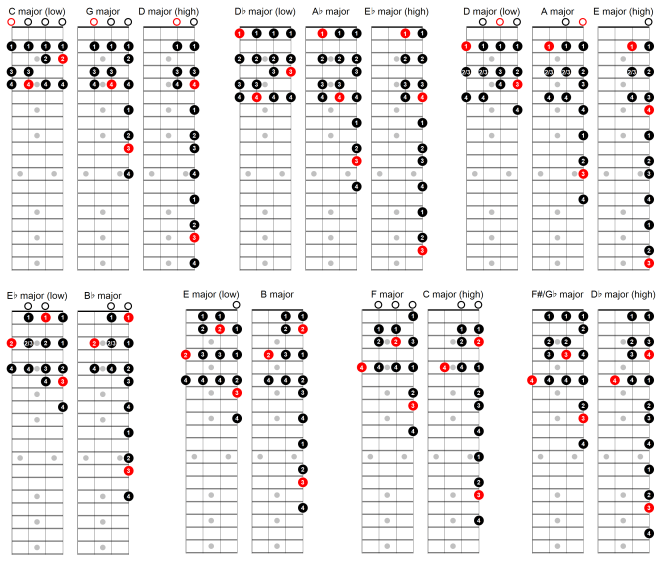
Now, here is the genius of the FFcP method: There are only FOUR ways to play a major tetrachord on the mandolin or tenor banjo:

ffcp-figure-3-tetrachord-diagrams

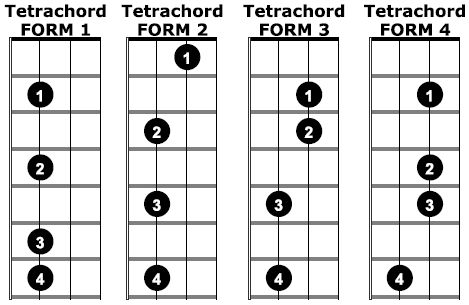
Do you see the WHOLE-WHOLE-HALF pattern in each one? It’s most obvious in Form 1.

By the way, each of these “Forms” can be moved around to start at ANY fret on ANY string, as long as it’s not too low or too high for all the fingers to fit.

Why is it so important that there are only these four “Forms”? Well, if you learn them — which is an easy task — you can play ALL the major scales without learning ANYTHING else!

This is very different from most other instruments. On the trumpet, for example, you have to learn a completely different fingering pattern for each scale, in each octave. To learn all the scales from low F# to high D, you have to learn 21 scale patterns. TWENTY-ONE! And each pattern has EIGHT notes, whose fingering has no immediately discernible logic. You just have to learn all the damn scales, one by one, over a period of years.

On the tenor banjo, you just learn FOUR different tetrachords (“Forms”), and each one has only FOUR notes. Much easier! Try fingering each one of them on your banjo, at different frets and on different strings. Give yourself a few minutes. Some of them will be easier than others. I personally find Form 4 the most natural and Form 2 the most uncomfortable.

. . .

Okay, now that you know how four basic tetrachord Forms feel, let’s use them to create a major scale. You just finger each form twice, and, voilà, you’ve got a major scale! Here they are in D major. (I’ve marked all the D’s in red.)

ffcp-figure-3-d-major-in-4-forms

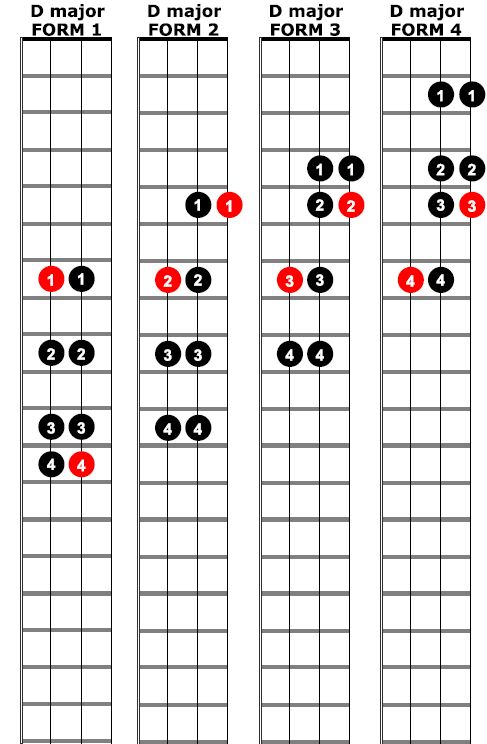
Try them out, again varying the frets and strings you use.

. . .

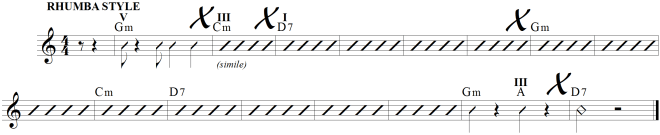
Remember, you can use any of these four Forms for ANY starting note. So, for example, if you want to play a low A major scale starting with the first finger, you would use Form 1, starting on the first string at fret 7:

ffcp-figure-4-a-major-form-1

If you wanted to start with the second, third or fourth fingers, you would use Forms 2, 3 or 4:

ffcp-figure-5-a-major-forms-2-3-4

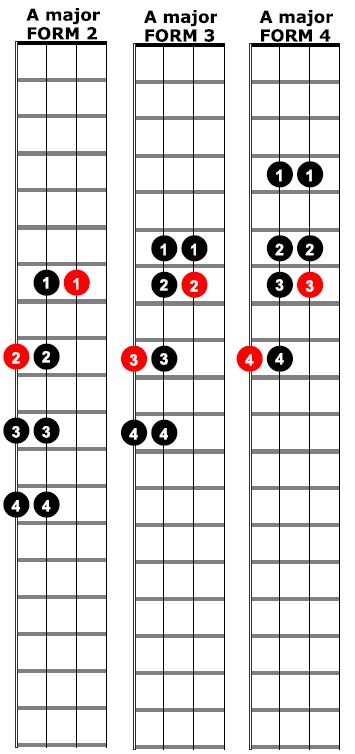
Notice that in each of these cases, you start on the same string and fret. The only difference is which finger you use to play the first note. This determines the Form you’ll use. Try them out!

. . .

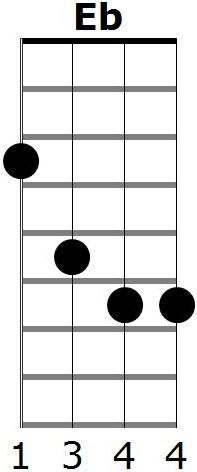
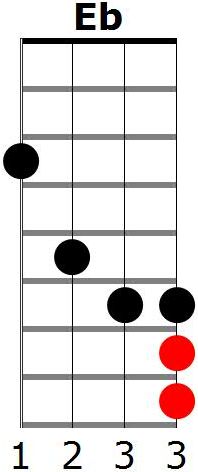
You can do just the same with any other scale. Let’s play a high Gb-major scale. Your starting note will be Gb on the third string, 11th fret:

ffcp-figure-6-gb-on-the-third-string

Decide which is the best Form for the sound and fingering you seek. In this case, all other factors being equal, I believe that Form 4 is a good combination of sound quality and ease of fingering:

ffcp-figure-7-gb-major-forms-1-2-3-4

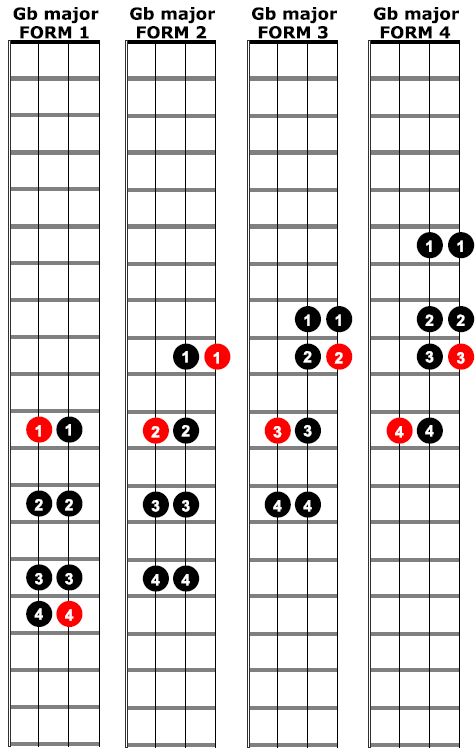
Try them out yourself — all four Forms, not just one or two. As I mentioned before, some of them will be easier than others. Also notice that some of them SOUND better than others. The ones that are near the nut generally sound more resonant and “banjo-like” (i.e. better) than the ones that are close to the bridge, which can sound rather tubby and characterless.

Fiddle around with these scales for an hour or two, and I guarantee that you will find it time well spent. I certainly have!

. . .

If you’ve followed the above explanation, you might reasonably have the following questions:

  1. How do I decide which note to start on?
  2. How do I decide which Form to use?
  3. What about scales with open strings? Where do they fit into this four-Form system?

But I have to stop for now. I hope to address these questions in my next post. See you soon….

A chord-melody practice sheet

Haven’t been doing much lately, but here’s a new practice sheet. Nothing very original, just some major chords on scale degrees 1, 3, 5 and 8, with fingerings. Below is an excerpt. For a nice PDF of the whole thing, click here or on the picture and look for “Chord-melody practice sheet”.

Chord-melody exercise 1-3-5-8

A couple more finger-independence exercises

I have made a couple more exercise sheets for finger independence. There’s nothing particularly original about them, but I’m finding them helpful. (Click on each image for a nice PDF version with more detailed instructions for how to use it.)

I call this one “Find the string”. It’s for helping the banjoist (that is, me) to get a better feel for where each string is, in relation to the fingers already on the string:

2016-05-26 Finger-independence exercise (2) - 'Find the string'

And I call this one “Chord notes”. I think this way of practicing chords is a rather old idea, certainly not original with me:

2016-05-26 Finger-independence exercise (3) - 'chord-notes'

My big chord list

As anyone who reads more than a post or two of this blog knows, I like to make documents: lists, exercises, whatever. There’s something about making a beautiful document that gives me almost as much satisfaction as playing. Maybe it’s because I’ve done so much playing already. In my career as a symphony trumpeter I performed a couple of thousand concerts and have nothing but memories and a few bad recordings. The music just vanishes into the ether. I know that’s part of music’s charm — up with live music! — but I do occasionally like to have something physical to hold in my hand after the work is done.

The crowning jewel of my recent efforts is my big tenor-banjo chord collection. I’ve been working on it for years (literally) and don’t ever expect to finish. 🙂 I decided to keep it in an all-text format for reasons of compactness and ease of updating. Here’s an excerpt of what it looks like in its current edition:

excerpt from Tenor banjo chords

Click here or on the picture to download a high-quality PDF of this masterpiece. (The link will take you to www.dmcclure.org/banjo, where you then need to click on “Tenor banjo chord list”.) I’d love to hear your opinion of it. Remember, this is my life’s work, so if you think it’s crap, be gentle. 🙂

Finger-independence exercise

When playing scales and other music, I’ve noticed that after an open note I often find myself fingering the wrong string because my fingertips have lost contact with the banjo. To avoid this, I find it helpful to place a finger in advance, before I need it. This helps me to keep my place on the fingerboard. For example, the two small notes in this example (A and F) are fingered where notated, but not played until two notes later:

2016-03-19 blog post (placing fingers in advance)

For this reason — and many others — I see that is is necessary to be able to move each finger from string to string independently, without moving the other fingers at all. (Otherwise they might bend a little and cause the other strings to buzz.) So I (who love to create exercises) have created “Finger-independence exercise (1)”. (It is number “(1)” because I expect I’ll be creating more finger-independence exercises in the future….) When I practice it, first I place all four fingers on a single string in a straight line. I then move one finger from string to string, trying fanatically not to move my other fingers at all. If I feel one of them touching another string, I consider that a mortal sin. I also try to keep all four fingers right behind their respective frets, not allowing them to slide up or down the string.

Of course, such perfectionist study is extremely demanding and shouldn’t be continued too long. I never do this exercise more for than 10 minutes at a time.

Anyway, here it is, for anyone who is interested. Click here or on the image to download a high-quality version in PDF format. (It will take you to a web page where you have to choose “Finger-independence exercise (1)”.)

2016-03-19 Finger-independence exercise (1)

Practicing chord changes

I’ve been planning on starting a Dixieland jazz combo for years, plans which were underway even before I had to stop playing the trumpet. In fact, the reason I chose the tenor banjo was because I still wanted to participate in this (still theoretical) group.

There’s another reason I wanted to play the banjo: Some years ago, while my trumpet chops were still working, I ran a jazz combo (regular jazz standards, not Dixieland) in my spare time. We were starting to get gigs, mostly weddings, and we could have gotten more. It was a lot of fun! But one thing ruined it for me: It was often almost impossible to find a decent jazz pianist to play with us. They do exist in Seville, but they are all inundated with work. Every gig was a crisis for me, as I had to search high and low for a piano player who was free. Most of our personnel stayed the same from gig to gig, but the pianist was always changing. It was a nightmare.

So if I can play the chordal/rhythm instrument myself, that problem is no more.

In a few weeks I hope to start getting musicians together and finally get the group underway. (Here in Seville there is no point in trying to do anything musical until Easter, as all the wind musicians are busy accompanying the Holy Week processions.) I am using the time to prepare the technique I’ll need for the Dixieland group. The tenor banjo can do lots of types of music — chord melody, song accompaniment, even classical music — but what I really need now is chordal accompaniment for a band. Trouble is, I’m not very good at it because I am slow at changing chords. (It’s amazing how quickly and smoothly a good player can run through the most difficult changes. Not me, though!) So I’m trying to work out how to improve this. Here’s my tentative system for practicing chord changes, adapted from the way I used to practice hard stuff on the trumpet:

1. I take a new piece, for example “St. Louis Blues”. The version I have starts like this:

St Louis Blues (beginning, for blog) - 1

2. I try out various inversions of each chord and decide which ones I am going to use. I then write them above each chord. The inversion is identified by the soprano note. So, for example, a “V” over a Gm chord means to use the inversion that has the fifth (in this case, a D) on the first string.

St Louis Blues (beginning, for blog) - 2

3. I try playing the chords. When there is a chord change I find difficult (pretty much all of them at this point!), I write a big “X” before the change:

St Louis Blues (beginning, for blog) - 3

4. I then practice ONLY the difficult changes, with the metronome on a very slow tempo, typically quarter note = 40. (Well, okay, from time to time I do allow myself to play ALL the chords, but only occasionally. I try to spend 90% of my time on the difficult ones.) So I do Gm (V) to Cm (III) a few dozen times, then Cm (III) to D7 (I), and so on to the end of the piece. I try to let the first of the two chords ring as long as I can before moving my left hand. Not easy! Is there a trick to this?  🙂

5. Little by little, over the course of several days or weeks, I speed up the metronome, one click at a time.

Let’s see if this system works! If anybody reading this has any suggestions, I’d love to hear them. I really need to get better at this….

Nut-position scales

I had terrible handwriting when I was a kid, but I always wanted to make nice-looking documents. When I learned to type in about 1969, it was a revolution for me. I could finally make beautiful documents (well, beautiful within the aesthetic possibilities of a mechanical typewriter). This was deeply satisfying for me.

When I bought a copy of Finale (the music-notation computer program), I was similarly thrilled. Even when all I am making is a practice sheet for my own use, I like to do it in Finale, just because the results can be so beautiful. (Of course there are other great music-notation programs. Finale just happens to be the one I use.) And if the music is actually something I will be using a lot, it is probably worth the effort to do it on the computer instead of writing it out by hand. (For those of you who haven’t used a music-notation program, I should explain that writing music by hand is generally faster than doing it on the computer, but the latter has a lot of other advantages, like high-quality output, easy error correction, the ability to hear what you’ve written, etc.)

Since I started the banjo, I also have found it fundamental to be able to make high-quality chord diagrams. (The program I use is Neck Diagrams, available at www.neckdiagrams.com.) I often combine music from Finale and chord diagrams from Neck Diagrams in the same document.

My latest masterwork is a practice sheet of major scales. As a trumpet player I was — naturally — more comfortable with scales than with chords, and I still like scales. I don’t feel in control of an instrument if I can’t play the major scales in ALL keys. The confusing thing for me on the banjo, as opposed to the trumpet, is that there are several ways to finger most notes. This means that there are lots and lots and LOTS of ways to do even the simplest scale. If, for example, I want to play this one-octave C major scale:

One-octave C major scale

all of the following — and many more — will give it to you:

One-octave C major (many versions)

I calculate that there are exactly 4,374 ways to play this one simple 8-note scale on the tenor banjo. So how to decide which to use? One could rely on books and expert advice, but banjo scales are not as standardized as, say, violoncello scales, so each expert says something different. Or one could copy the fingerings from the cello, which is a very similar instrument to the banjo in many ways … but its fingerings don’t always adapt well to the banjo, especially in the cello’s “thumb position”.

In the end I decided that, at least for now, I would use the scales that stay as close to the nut as possible. They are certainly not the most comfortable of fingerings, and I know that in the future I will learn more elegant versions, but for now at least I have a complete set to practice. Here are all 17 of the two-octave scales on the tenor banjo, as I have arranged them:

Major scales - 2 octaves - nut position
You can see they fall into groups, depending on what fret you start on.

I practice them slowly every day, just to help me feel “right” on the banjo. I really don’t expect to need B major or Gb major any time soon, but being able to play them makes me feel more at home on the instrument.

You can see a nicer version of these scales, including a few scale and arpeggio exercises, at my banjo web page, www.dmcclure.org/banjo; look for “Major scales (nut position)”.

My practice spreadsheet

Hi everybody! Believe it or not, I have not quit the banjo, though I did quit blogging for a while. As usual, real life intruded and I couldn’t practice regularly, but I never completely stopped. Now I’ve got a bit more time.

I’m afraid I am something of a spreadsheet fanatic. I use them for just about everything. Okay, I don’t have a spreadsheet listing my favorite spreadsheets, but almost. I do have, for example, a spreadsheet for all the light bulbs in our home. Is that fanatical or what? (To be fair, we have something like 36 different kinds of light bulbs in our little house.)

Spreadsheet fanaticism probably doesn’t seem very compatible with music-making, but I have always (in my trumpet years) kept records of my practice. (Good organization makes up for a lack of genius….) So now I maintain a spreadsheet called “BanjoPrax.xlsx” to manage my progress and future plans. I am trying to learn several different aspects of the banjo simultaneously, and the spreadsheet helps me to keep track. Here’s an example of a few days’ practice: practice_spreadsheetI wouldn’t be without it.


Ideas for a melody-chord fingering chart

So many banjo books start with the idea that you have to spend a lot of time learning single-note melodies before you start playing chords and — heaven forbid! — chord melody. As a former trumpet player — and thus by nature a melodic rather than chordal thinker — I am comfortable with this. But maybe it would be better to start beginners RIGHT OFF with CHORD MELODY, from their first note, as if it were the ONLY WAY to play the banjo.

In other words, it might be nice if the beginning tenor-banjo player would simply learn that the note+chord combination

F note with F major chord

is played on frets 023X (the teacher or the method book could suggest fingerings). At this point there would be no need to learn any theory. For the student, it is just a melody note with a chord symbol on top of it, which equals a specific fingering.

Then, as if it were simply another note, he/she would learn that

F note with G7 chord

is played 243X. Again, no chord theory — that could come later. In other words, at the beginning, you just learn that

low F note + F chord = 023X

low F note + G7 chord = 243X

(etc.)

Within a few weeks, of course, the player will learn the “real” explanation of just what chord melody is and how it works. But it seems to me that a beginning student’s lack of theoretical knowledge is no reason for him/her not to start right in on chord melody.

So (I was thinking) … what if somebody did write a banjo method for absolute beginners based ENTIRELY on CHORD MELODY? How would they organize it? I am familiar with a lot of beginning trumpet method books, and you could do worse than to imitate them.

One thing which beginning trumpet methods always have is a COMPLETE LIST, on the first or last page, of ALL the fingerings used in the book. It is presented in reference order (usually chromatic), not learning order (which is the job of the lessons in the body of the book). The student can refer to this list any time he/she has a doubt about fingering. (The most proactive students will probably be fascinated by the list and try out all the chords on their own, which will presumably do them no harm.)

This list has to be simple and easy to understand. Beginning trumpet fingering charts generally have a very simple and elegant presentation:

Beginner's trumpet fingering chart

Although the above chart is for beginners — a more advanced one would include alternative fingerings and higher notes — even an advanced chart is very simple and almost impossible to misunderstand.

I started wondering whether I could make a trumpet-style fingering chart for this (theoretical) beginning banjo method. Chord diagrams are all very well and good, but there must be an alternative which is more space-efficient but still very easy to understand. Of course, since each melody note on the banjo has several possible versions, depending on which chord is to be played with it (not to mention the many alternative chords), a “simple” banjo fingering chart will necessarily have more entries — and more fingering numbers — than a trumpet chart. But it could still be SIMPLE.

My first idea was to have my chart look something like this, very similar to the trumpet chart shown above:


I like it a lot — it is easy to understand and occupies very little space. The very definition of elegant and simple. (Note: I have chosen to use actual pitch for the notes, as is common in chord-melody methods.)

However, there is an equally elegant, though less space-efficient, way to present the same information. And it has the advantage of centuries of tradition, so it will be instantly understandable to any banjoist. It is, of course, tablature:

F note with F major chord and tablature            F note with G7 chord and tablature

(Another advantage of tablature is that is easy to create in my music-editing program, Finale.)

A practical application: I am presently learning “Oh, Susanna” in C major, from Tim Allan’s Notebook, pp. 22-23. It is a simple chord-melody version of the tune in two octaves, and Tim very sensibly starts out with a list of all the versions of the four chords used (C, F, G7 and Am), including some short “etudes” to practice the chord inversions. All the C chords come together, then an etude, then F and an etude, and so on.

I wouldn’t change a thing about Tim’s presentation, which is perfect for what he is teaching. But if I were going to write the absolute beginner’s banjo method described above, perhaps I would print something like the following at the beginning of the book:

Fingering chart for Tim Allan's

(You can click on the above image to get a nicer PDF version.) By the way, I added a few chords that were not in Tim’s listing.

Of course the above chart is just for one piece, “Oh, Susanna”. A complete chart for an entire book would include more chords. Over the next few weeks I will experiment with this format to see if it is at all useful, adding new (basic) melody chords as I come across them.

Okay, you ask, so what’s the innovation? Well, in fact, I would not be surprised to find out that someone else has already done exactly the same thing as I have described here. But if they haven’t, I guess my new twist is the idea of making a reference list of melody chords in chromatic order, with no attempt at including anything other than fingering. I know this is an anti-intellectual approach, but, remember, it is only for beginners.

My lesson with Tim Allan

This past Wednesday I had an on-line lesson with Tim Allan, a fantastic player who has been around for a long time — he was inducted into the National Four-String Banjo Hall of Fame back in 2002. I knew of him through some of his books and recordings (I have his 40 Easy Reading Song Arrangements and Tim Allan’s Notes) and later via his YouTube videos.

He is a really nice guy, and the lesson was quite relaxed, but nonetheless he got a lot of information across. Over the years I’ve taken and given literally thousands of music lessons, and I consider myself something of an expert. One thing I liked about Tim was that he was quite sensitive to what I personally needed. (Not that it was particularly difficult for him — I came prepared with a long list of questions.) This is typical of good teachers — they observe their students and tailor the lesson to the student, instead of delivering a canned sermon….

I won’t go into everything he told me — that would be telling — but after the class I wrote up my notes about what I’d heard, and they took up two pages in rather small type! Since this was my first banjo lesson with anyone, a lot of my questions were to see if the things I was already doing were correct. Among other things, my questions were about:

  • left hand position
  • pick holding
  • position of other right-hand fingers
  • where the banjo should rest when playing seated
  • Dixieland chordal accompaniment style
  • fingering — guitar-style or mandolin-style?
  • how to connect chords
  • how to speed up my chord changes
  • whether I should use a strap

In general, I was not surprised by his answers — after all, I have spent years gathering data from method books, the Internet, videos, etc., so I was hardly unprepared. But it was good to get confirmation of some the things I wasn’t entirely sure about.

One thing I have learned over the years (on the trumpet) is that, when you have a lesson or master class with a top player, it is often best just to relax and observe him/her, rather than focusing solely on getting specific information. Subleties about posture, timing, use of tension, musical interpretation, etc. are best communicated on an almost wordless level. In fact, the observant student can sometimes learn things the the teacher doesn’t even realize he/she is teaching.

A lot of this stuff can be observed in concerts, which are, after all, public displays of what the player can do, but the communication in a private lesson is more two-way and much more relaxed. And you get the chance to ask your teacher to repeat things you didn’t catch the first time!

Although my present ambition is mainly to become an acceptable jazz-band rhythm player, what the tenor banjo is really all about is chord melody. That is, instead of just strumming accompaniment chords while someone else plays or sings the melody, the banjoist chooses the chords so that the most prominent notes (usually the highest ones) ARE the melody. This considerably increases the difficulty of playing, but it is something that I want to learn.

One of the things Tim said was that, where possible, the banjoist should choose chord fingerings which leave the left pinkie finger free to play melody tones. This means changing some of the standard fingerings found in method books. For example,

Eb (1 - traditional)   becomes   Eb (2 - pinkie free)                    and                    G7 (1 - traditional)   becomes   G7 (2 - pinkie free).

This allows the pinkie to play some extra non-chordal melody notes (the red dots). I understood this in principle, having read about it in one of Tim’s books, but I confess I was a little afraid to bend the first joint of the finger backwards, as these fingerings require. I guess I felt it would break or something. After seeing it demonstrated and subsequently trying it out for myself, I am convinced.

To cut a long story short: the lesson was a good experience, and I hope to repeat it sometime soon. Tim will be doing a European tour next month, but unfortunately he will not be anywhere near Seville. I’d love to see him live!